iOS2012. 9. 17. 13:14

This is the approach I use for iOS 4 and 5 compatibility:

if ([toolbar respondsToSelector:@selector(setBackgroundImage:forToolbarPosition:barMetrics:)]) {
   
[toolbar setBackgroundImage:[UIImage imageNamed:@"toolbar-background"] forToolbarPosition:UIToolbarPositionAny barMetrics:UIBarMetricsDefault];
} else {
   
[toolbar insertSubview:[[[UIImageView alloc] initWithImage:[UIImage imageNamed:@"toolbar-background"]] autorelease] atIndex:0];
}

Posted by 다오나무
iOS2012. 9. 3. 13:28

For Gigster’s navigation concept it was necessary to implement a custom styled tab bar. Basically the screen is divided into three parts:

  • Navigation Bar
  • Tab Bar
  • Content

The navigation bar has a custom background image and a fixed title with custom font. The tab bar should be directly under the navigation bar and has complete custom styling.

Basic Setup

To start off I created a new Xcode project and added a UITabBarController with three static views. Although I have XIBs for each content view, I added everything else in code. Each view has a UINavigationController so it can easily contain its own navigation stack.

Navigation Bar

An easy technique to get a custom background in a UINavigationBar is to make a cateogory. Add this code (e.g. in YourAppDelegate.m):

@interface UINavigationBar (MyCustomNavBar)
@end
@implementation UINavigationBar (MyCustomNavBar)
- (void) drawRect:(CGRect)rect 
{
    UIImage *barImage = [UIImage imageNamed:@"nav_bg.png"];
    [barImage drawInRect:rect];    
}
@end

To get the fixed title with custom font I added a method that creates a UILabel:

- (UILabel *)_makeTitleLabel
{
    CGRect frame = CGRectMake(0032044);
    UILabel *label = [[[UILabel alloc] initWithFrame:frame] autorelease];
    label.backgroundColor = [UIColor clearColor];
    label.font = [UIFont fontWithName:@"Marker Felt" size:24];
    label.shadowColor = [UIColor colorWithWhite:0.0 alpha:0.5];
    label.textAlignment = UITextAlignmentCenter;
    label.textColor = [UIColor whiteColor];
    label.text = @"Custom Tab Bar";
    
    return label;
}

- (BOOL)application:(UIApplication *)application didFinishLaunchingWithOptions:(NSDictionary *)launchOptions
{
    ...
    // add static title labels
    [tab1NavigationController.navigationBar addSubview:[self _makeTitleLabel]];
    [tab2NavigationController.navigationBar addSubview:[self _makeTitleLabel]];
    [tab3NavigationController.navigationBar addSubview:[self _makeTitleLabel]];
    ...
}

Tab Bar

A little bit of frame hackery was necessary to get the tab bar right beneath the navigation bar:

    // disable autosizing of tabbar and move it to correct position
    tabBarController.tabBar.autoresizingMask = 0;
    tabBarController.tabBar.frame = CGRectMake(04432065);
    
    
    // fix frame of tabbarcontroller's view
    CGRect frame = tabBarController.view.frame;
    frame.size.height += 29;
    frame.origin.y = 20;
    tabBarController.view.frame = frame;

To have a custom layout for the tab bar, it is necessary to subclass UITabBarController. We don’t need UIKit’s tab bar at all, so we just hide it and create our own custom tabs:

- (void)viewDidLoad
{
    // find the normal tab bar and hide it
    for(UIView *view in self.view.subviews)
    {
        if([view isKindOfClass:[UITabBar class]])
        {
            view.hidden = YES;
            break;
        }
    }
    
    [self _setupCustomTabBar];
}

First I added a UIImageView containing a background image:

- (void)_setupCustomTabBar
{
    // background image
    self.bgImageView = [[[UIImageView alloc] initWithImage:[UIImage imageNamed:@"tabs_bg.png"]] autorelease];
    bgImageView.frame = CGRectMake(04432065);
    [self.view addSubview:bgImageView];

Next we want to display a tab image to indicate which tab is active:

    self.contentView = [[[UIView alloc] initWithFrame:CGRectMake(04464065)] autorelease];
    [self.view addSubview:self.contentView];
    
    // sliding tab image
    self.tabImage = [[[UIImageView alloc] initWithImage:[UIImage imageNamed:@"tab.png"]] autorelease];
    CGRect frame = self.tabImage.frame;
    frame.origin = CGPointMake(BUTTON_X_OFFSET, BUTTON_Y);
    self.tabImage.frame = frame;
    [self.contentView addSubview:self.tabImage];

Finally I added three buttons to trigger tab selection:

    // Make custom tab buttons and add them to the content view
    [self.contentView addSubview:[self _makeTabButtonWithTitle:@"Tab 1" atIndex:0]];
    [self.contentView addSubview:[self _makeTabButtonWithTitle:@"Tab 2" atIndex:1]];
    [self.contentView addSubview:[self _makeTabButtonWithTitle:@"Tab 3" atIndex:2]];
}

Button creation method:

- (UIButton *)_makeTabButtonWithTitle:(NSString *)title
                              atIndex:(NSInteger)index
{
    UIButton *button = [UIButton buttonWithType:UIButtonTypeCustom];
    button.frame = CGRectMake(BUTTON_X_OFFSET + index*BUTTON_WIDTH, BUTTON_Y, BUTTON_WIDTH, BUTTON_HEIGHT);
    button.tag = index;
    button.titleLabel.font = [UIFont fontWithName:@"Marker Felt" size:18];
    button.titleLabel.shadowColor = [UIColor colorWithWhite:0 alpha:0.5];
    button.titleLabel.shadowOffset = CGSizeMake(0-1);
    [button setTitle:title forState:UIControlStateNormal];
    [button addTarget:self action:@selector(_buttonClicked:) forControlEvents:UIControlEventTouchUpInside];
    
    return button;
}

Note that the buttons’ action is _buttonClicked. There we need to set the currently selected tab index in the UITabBarController.

- (void)_buttonClicked:(id)sender
{
    self.selectedIndex = [sender tag];
    [self _updateTabImage];
}

We also want to update the tab image’s position after a tab was selected. This is what _updateTabImage is for:

- (void)_updateTabImage
{
    CGRect targetRect = CGRectMake(BUTTON_X_OFFSET + self.selectedIndex*BUTTON_WIDTH, BUTTON_Y, BUTTON_WIDTH, BUTTON_HEIGHT);
    
    [UIView beginAnimations:nil context:NULL];
    [UIView setAnimationDuration:0.3];
    [UIView setAnimationCurve:UIViewAnimationCurveEaseInOut];
    
    [self.tabImage setFrame:targetRect];
    
    [UIView commitAnimations];
}

Now we have a fully functioning tab bar with custom layout. You can download the full Xcode project here:MyCustomTabBar_final.zip.

Gigster in the App Store: Jump

Posted by 다오나무
카테고리 없음2012. 9. 3. 11:13

iOS 5 Tutorial: Creating a Custom Tab Bar Controller

I'm currently revamping an iPhone app that I made for the New Student Orientation Program at Columbia University. The app has this beautiful custom tab bar that my friend designed and so I am re-implementing it for iOS 5.

I literally just spent the last three hours figuring out how to do this so hopefully I can save you all time.

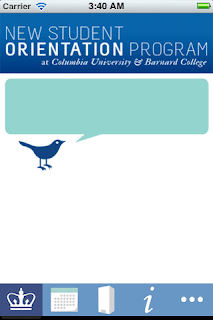
Finished Product:


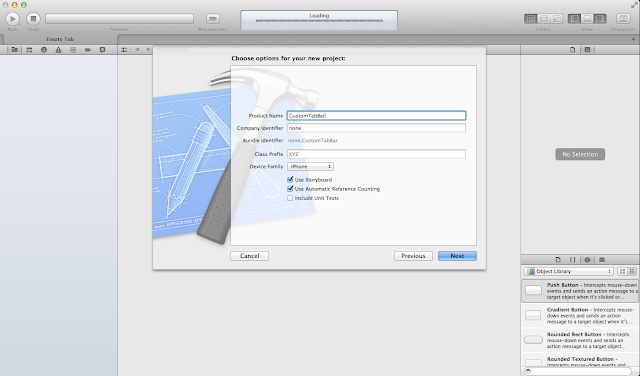
1. Create a New Tabbed Application.


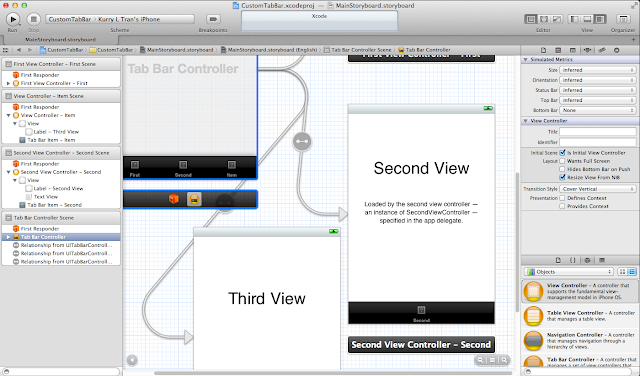
2. Go to the MainStoryboard file and drag and drop three view controllers and connect them to the tab bar controller.


When You're Finished You Should Have Five Views Connected Like This:


Note: Go to the right sidebar and delete the title for each of the toolbar buttons as well. Like this:


3. Because this is a tutorial about creating a custom tab bar, it's not necessary to create custom view controllers so I'm just going to use the auto generated FirstViewController.m file to do all of the work.

Download These Images: here.

My friend made these and so you can just download them and add them to your project. All of the images are 64px x 49px since 320px width / 5 = 64 px, and 49 px high because we thought that looked good.

The dark blue is for when the view is selected and the light blue is for when the view is unselected.

Note: The images were hard to format in Blogger hence the mess.


4. Drag and drop the downloaded images into your project.

 5. Go to the FirstViewController.m file and add the following code below in the viewDidLoad method. The code essentially says that for each tab bar item at the index, when selected set the image to the dark blue image and when the tab bar item is unselected set it to the light blue image.

Data provided by Pastebin.com - Download Raw - See Original
  1. - (void)viewDidLoad
  2. {
  3.     UIImage *selectedImage0 = [UIImage imageNamed:@"HomeDB.png"];
  4.     UIImage *unselectedImage0 = [UIImage imageNamed:@"HomeLB.png"];
  5.    
  6.     UIImage *selectedImage1 = [UIImage imageNamed:@"ScheduleDB.png"];
  7.     UIImage *unselectedImage1 = [UIImage imageNamed:@"ScheduleLB.png"];
  8.    
  9.     UIImage *selectedImage2 = [UIImage imageNamed:@"BuildingsDB.png"];
  10.     UIImage *unselectedImage2 = [UIImage imageNamed:@"BuildingsLB.png"];
  11.    
  12.     UIImage *selectedImage3 = [UIImage imageNamed:@"InformationDB.png"];
  13.     UIImage *unselectedImage3 = [UIImage imageNamed:@"InformationLB.png"];
  14.    
  15.     UIImage *selectedImage4 = [UIImage imageNamed:@"MoreDB.png"];
  16.     UIImage *unselectedImage4 = [UIImage imageNamed:@"MoreLB.png"];
  17.    
  18.     UITabBar *tabBar = self.tabBarController.tabBar;
  19.     UITabBarItem *item0 = [tabBar.items objectAtIndex:0];
  20.     UITabBarItem *item1 = [tabBar.items objectAtIndex:1];
  21.     UITabBarItem *item2 = [tabBar.items objectAtIndex:2];
  22.     UITabBarItem *item3 = [tabBar.items objectAtIndex:3];
  23.     UITabBarItem *item4 = [tabBar.items objectAtIndex:4];
  24.    
  25.     [item0 setFinishedSelectedImage:selectedImage0 withFinishedUnselectedImage:unselectedImage0];
  26.     [item1 setFinishedSelectedImage:selectedImage1 withFinishedUnselectedImage:unselectedImage1];
  27.     [item2 setFinishedSelectedImage:selectedImage2 withFinishedUnselectedImage:unselectedImage2];
  28.     [item3 setFinishedSelectedImage:selectedImage3 withFinishedUnselectedImage:unselectedImage3];
  29.     [item4 setFinishedSelectedImage:selectedImage4 withFinishedUnselectedImage:unselectedImage4];
  30.     [super viewDidLoad];
  31.         // Do any additional setup after loading the view, typically from a nib.
  32. }
  33.  


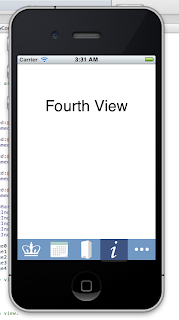
 6. Build and run and you should be good to go.


Download Project Here: here.

Posted by 다오나무
iOS2012. 6. 20. 19:07

일반적인 경우라면 iOS에서 기본적으로 제공하는 Cell Type을 통해 구현이 가능하지만, 특별히 사용자가 디자인한데로 cell을 만들어 사용하는 방법도 있다. Interface Builder를 통해 cell xib를 만들어 customize 한 cell을 만들어 보자.

1. 프로젝트를 생성하고 "UITableViewCell" 을 상속받은 Objective-C 클래스를 생성한다.


2. Custom Cell을 꾸밀 xib파일을 생성한다.(일반적으로 objective-c 클래스 파일 이름과 xib이름을 동일하게 - CustomCell이라고 - 만든다)

3. xib파일을 열어 우측 하단의 library에서 "Table View Cell"을 끌어다 놓는다. 끌어다 놓은 Table View Cell을 선택하고"Identity Inspector" 창에서 Custom Class를 위에서 만든 Objective-c Class인 "CustomCell"로 지정한다.

 4. xib에 구성하고 싶은 UI들을 올려놓고 "CustomCell class"에서 IBOutlet을 이용하여 UI component들과 연결을 한다.
 
5. TableView를 사용하기 위한 기본설정을 한다. 기본적인 내용은 여기에서 확인하면 된다.

6. ViewController.h에 TableView에 넣을 NSArray형태의 데이터를 @property로 선언하고 @synthesize로 선언한다.
 //ViewController.h
@property (retainNSMutableArray *products;
//ViewController.m
@synthesize products; 
 
 
7. 테이블에 들어갈 내용이 상품정보임으로 상품정보를 가지고 있을 Objective-C클래스(domain object)를 만든다.(이름은 Product라는 이름으로 만든다.)
 
 
8. CustomCell에 Product를 넘기면 Product의 property값을 CustomCell에 set해주는 method를 만들어 준다.

9. TableView 사용시 구현해야할 delegate method들을 구현한다.
 

 [실행 결과]

Posted by 다오나무