우분투2012. 7. 7. 18:20

1.APM
   1)MySQL 설치
     ~$sudo apt-get install mysql-common libdbd-mysql-perl libdbi-perl libhtml-template-perl libmysqlclient15off libnet-daemon-perl libplrpc-perl mysql-client mysql-client-5.0 mysql-server mysql-server-5.0 mysql-server-core-5.0
     (설치중 mysql root 비밀번호 입력)

     또는
     ~$sudo apt-get install mysql-common
     ~$sudo apt-get install mysql-client mysql-server
     (설치중 mysql root 비밀번호 입력)


   2)Apache 설치
     ~$sudo apt-get install apache2 apache2-utils apache2.2-common libapr1 libaprutil1 libpq5 libapache2-mod-auth-mysql apache2-mpm-prefork libapache2-mod-php5 php5-common

     또는
     ~$sudo apt-get install apache2
     ~$sudo apt-get install libapache2-mod-auth-mysql
     ~$sudo apt-get install libapache2-mod-php5


   3)PHP 설치
     ~$sudo apt-get install php5 php5-mysql libgd2-xpm libt1-5 php5-gd

     또는
     ~$sudo apt-get install php5
     ~$sudo apt-get install php5-mysql
     ~$sudo apt-get install php5-gd


   4)MySQL서버 정상 작동 확인
     ~$sudo netstat -tap | grep mysql 명령 후
     tcp  0  0 localhost:mysql  *:*  LISTEN 이 나오면 정상
     위의 내용이 안나오면 MySQL 재시작
     ~$sudo /etc/init.d/mysql restart


   5)PHP 정상 작동 확인
     /var/www/ 폴더안에 phpinfo.php 파일을 만들고 아래 내용을 입력한 후 웹브라우저로 확인
     ~$cd /var/www
     ~$gedit phpinfo.php
     편집기(gedit)가 뜨면 아래 내용을 입력
<? phpinfo(); ?>
     저장하고 편집기 종료
     웹브라우저 주소에 http://localhost/phpinfo.php 입력
     PHP 정보화면이 나오면 정상
     파일을 저장하겠냐고 물어본다면 Apache2 를 재시작 해준다
     ~$sudo /etc/init.d/apache2 restart


2.Apache
~$sudo gedit /etc/apache2/sites-available/default
~$sudo gedit /etc/apache2/apache2.conf
~$sudo gedit /etc/apache2/httpd.conf
~$sudo gedit /etc/apache2/ports.conf


  1)아파치 Module rewrite 셋팅
     ~$sudo gedit /etc/apache2/sites-available/default 열고
     앞부분에 있는 2개의 AllowOverride None 에서 None을 FileInfo 또는 All 로 변경
NameVirtualHost *
<VirtualHost *>
  ServerAdmin webmaster@localhost
  
  DocumentRoot /var/www/
  <Directory />
    Options FollowSymLinks
    AllowOverride None   //--- FileInfo 또는 All 로 변경
  </Directory>
  <Directory /var/www/>
    Options Indexes FollowSymLinks MultiViews
    AllowOverride None   //--- FileInfo 또는 All 로 변경
    Order allow,deny
    allow from all
  </Directory>
...
     저장 후
     ~$sudo a2enmod rewrite
     ~$sudo /etc/init.d/apache2 restart


   2)아파치 기본 웹서버 디렉토리 변경위한 셋팅 (필요한 경우)
     ~$sudo gedit /etc/apache2/sites-available/default 에서 변경. 기본값은 /var/www/ 임.
DocumentRoot /var/www/   //---제로보드XE가 설치될 폴더로 변경
<Directory />
  ...
</Directory>
<Directory /var/www/>    //---제로보드XE가 설치될 폴더로 변경
  ...
</Directory>
     저장 후
     ~$sudo /etc/init.d/apache2 restart


   3)아파치 가상 호스트 셋팅 (필요한 경우)
     만약  a.com 과 b.com이 내 서버의 ip를 가리키고 있을때 각 도메인마다 다른 페이지를 할당하고 싶을시에는
     ~$sudo gedit /etc/apache2/sites-available/default 에서 기존값 변경없이 맨밑줄에 아래 내용 추가
...
<VirtualHost *:80>
  DocumentRoot 원하는 디렉토리1
  ServerName a.com
  ServerAlias *.a.com
</VirtualHost>

<VirtualHost *:80>
  DocumentRoot 원하는 디렉토리2
  ServerName b.com
  ServerAlias *.b.com
</VirtualHost>
     저장 후
     ~$sudo /etc/init.d/apache2 restart


3.PHP
   1)파일 업로드 용량 증가를위한 php 셋팅
     ~$sudo gedit /etc/php5/apache2/php.ini 에서 아래 기본 값을 원하는 값만큼 증가
memory_limit = 16M  <-- 16M~   시스템 사양에 따라서..
post_max_size = 8M  <-- 20M 권장
upload_max_filesize = 2M <-- 200M 권장
     post_max_size는 post되는 정보의 사이즈를 설정하는 것이고
     upload_max_filesize는 업로드 가능한 최고용량을 설정하는 것이다
     저장 후
     ~$sudo /etc/init.d/apache2 restart


4.MySQL
   1)데이터베이스 만들기
     MySQL에 root로 로그인
     ~$mysql -u root -p
     DB를 생성
     mysql> create database DB명;   (세미콜론을 꼭 입력하세요. create database xe;)
     DB가 만들어 졌는지 목록을 확인
     mysql> show databases;
     mysql> exit
     ~$sudo /etc/init.d/mysql restart


   2)mysql환경을 UTF-8로 변경 (안해도 됨)
     ~$sudo gedit /etc/php5/apache2/php.ini 에서 캐릭터셋 수정
/*------------
;default_charset = "iso-8859-1"
default_charset = "utf-8"

     ~$sudo gedit /etc/mysql/my.cnf 에서 캐릭터셋 수정
/*------------
[client]
#password = your_password
default-character-set=utf8

[mysqld]
init_connect=SET collation_connection = utf8_general_ci
init_connect=SET NAMES utf8
default-character-set=utf8
character-set-server=utf8
collation-server=utf8_general_ci

     ~$sudo /etc/init.d/mysql restart


5.FTP
   1)설치
     ~$sudo apt-get install vsftpd

   2)셋팅
     ~$sudo gedit /etc/vsftpd.conf 의 아래항목 수정
         anonymous_enable=NO 로 변경
         local_enable=YES 의 주석 삭제
         write_enable=YES 의 주석 삭제
     저장 후
     ~$sudo /etc/init.d/vsftpd restart


6.SSH
   1)설치
     ~$sudo apt-get install ssh

   2)셋팅
     ~$sudo gedit /etc/ssh/sshd_config
         Port 22 #다른 포트로 변경
         PermitRootLogin yes #원격에서 루트로긴 금지하려면 no로 변경
     저장 후
     ~$sudo /etc/init.d/ssh restart


7.제로보드XE
   1)설치
     압축을 풀고 설치할 폴더(/var/www/) 에 복사
     제로보드XE가 설치된 폴더가 /var/www/ 라면 www 폴더에 퍼미션을 설정
     ~$cd /var
     ~$sudo chmod 707 www


   2)설정
     /var/www/ 폴더 안에 있는 index.html 파일을 삭제
     ~$cd /var/www
     ~$sudo rm index.html
     웹브라우저 주소에 http://localhost/index.php 입력
     라이선스 동의
     필수 설치조건 확인하고 설치를 진행
     FTP 정보 입력 (무시해도 됨. 나중에 할 수 있음) 하고 설치를 진행
     DB선택 (MySQL) 하고 설치를 진행
     DB & 관리자 정보 입력
DB 아이디 입력 (MySQL 아이디, 기본 : root)
DB 비밀번호 (MySQL 설치시 입력한 root 비밀번호)
DB 데이터베이스 (MySQL 에서 생성한 DB명)
...
아이디 입력 (XE 관리자 아이디, 기본 : admin)
비밀번호 입력 (XE 관리자 비밀번호)
...
rewrite mode 사용 체크 하고 등록

     관리자 페이지 로그인
     (http://localhost/?module=admin) 또는 (rewrite mode 사용시 - http://localhost/admin)
     설치 끝

Posted by 다오나무
우분투2012. 7. 7. 14:07

1. 사용자 및 폴더에 권한부여
sudo chown -R ftpadmin /var/www 
sudo chmod -R 775 /var/www 

2. vsftpd.conf 파일 수정
sudo vi  /etc/vsftpd.conf 
# Uncomment this to enable any form of FTP write command.
#write_enable=YES
위 항목 찾아서 아래와 같이 주석 제거
write_enable=YES 

3.vsftpd 서비스 재시작
sudo /etc/init.d/vsftpd restart

Posted by 다오나무
Hpple2012. 7. 6. 13:29

(모든 사진들은 클릭하여 원본크기로 보실수 있습니다.)


파싱하려는 사이트는 기상청(http://www.kma.go.kr/index.jsp)입니다.

날씨가 아닌 국외 지진목록(http://www.kma.go.kr/weather/earthquake/internationallist.jsp)을 파싱해보겠습니다.

================================================================================


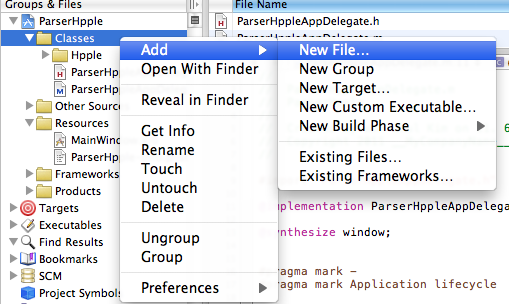
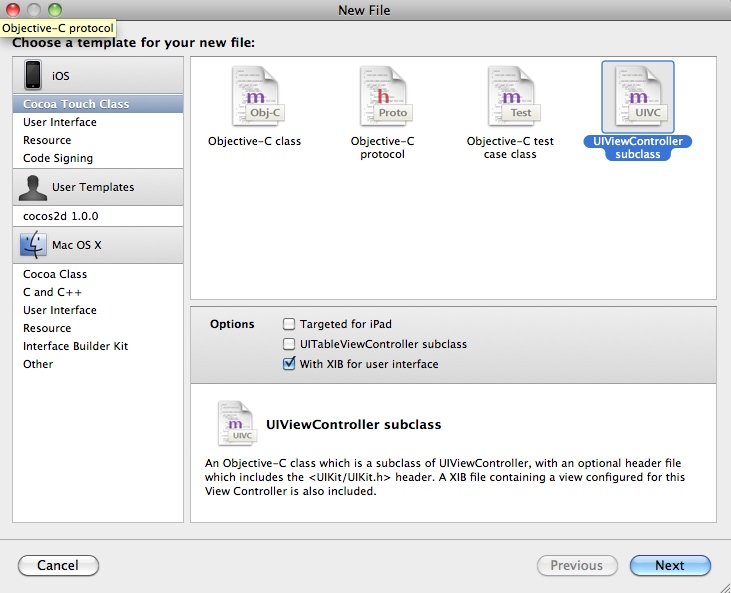
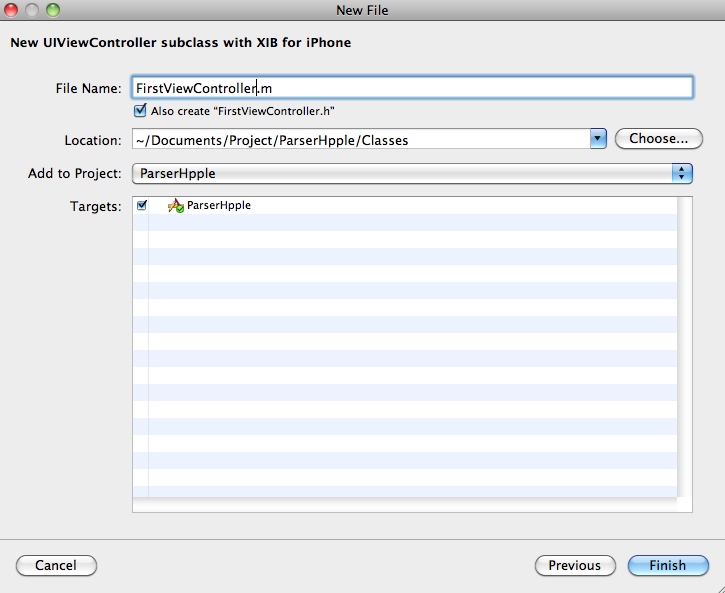
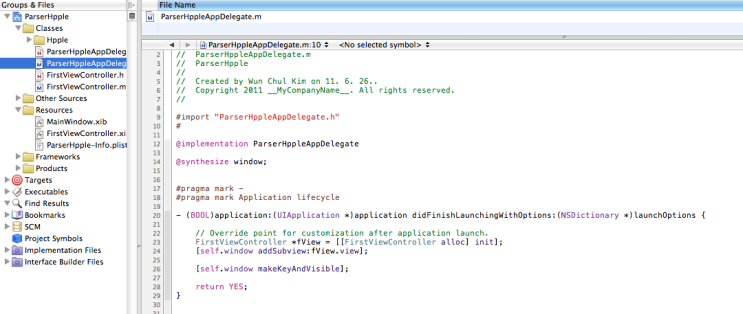
뷰컨트롤러를 추가합니다.


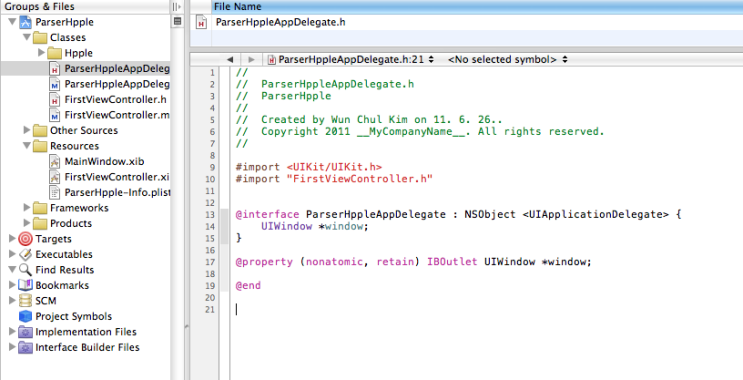
ParserHppleAppDelegate.h 로 갑니다.


#import "FirstViewController.h"

===============================================================================

만들어준 FirstViewController를 참조합니다. 


ParserHppleAppDelegate.m


FirstViewController *fView = [[FirstViewController allocinit];

[self.window addSubview:fView.view];

================================================================================

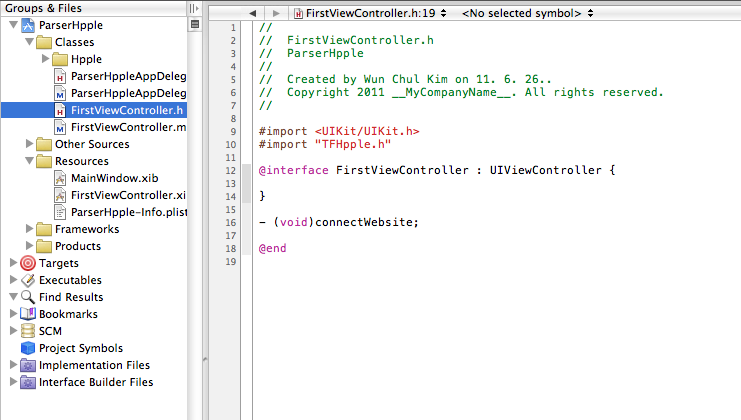
FirstViewController클래스의 인스턴스를 가리키는 fView 인스턴스 변수를 만듭니다.

init메서드를 이용해서 객체를 초기화 시킵니다.


FirstViewController.h


#import <UIKit/UIKit.h>
#import "TFHpple.h"

@interface FirstViewController : UIViewController {
    
}

- (void)connectWebsite;

@end

================================================================================

#import "TFHpple.h"

Hpple를 사용하기위해 임포트 시킵니다.


- (void)connectWebsite;

홈페이지와 통신을 위한 메서드를 하나 만들어줍니다.


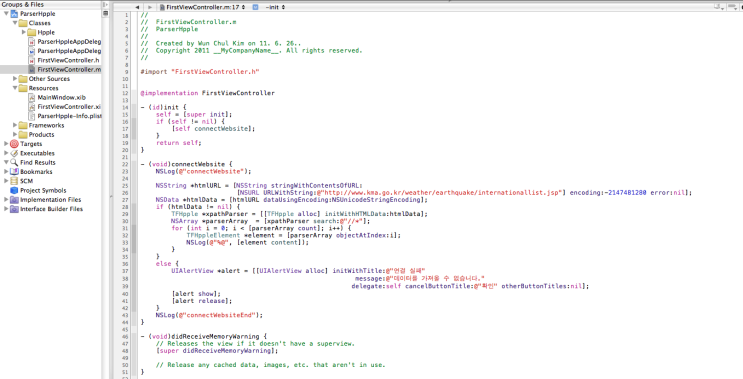
FirstViewController.m


#import "FirstViewController.h"

@implementation FirstViewController

- (id)init {
    self = [super init];
    if (self != nil) {
        [self connectWebsite];
    }
    return self;
}

- (void)connectWebsite {
    NSLog(@"connectWebsite");
    
    NSString *htmlURL = [NSString stringWithContentsOfURL:
                         [NSURL URLWithString:@"http://www.kma.go.kr/weather/earthquake/internationallist.jsp"encoding:-2147481280 error:nil];
    NSData *htmlData = [htmlURL dataUsingEncoding:NSUnicodeStringEncoding];
    if (htmlData != nil) {
        TFHpple *xpathParser = [[TFHpple alloc] initWithHTMLData:htmlData];
        NSArray *parserArray  = [xpathParser search:@"//*"];
        for (int i = 0; i < [parserArray count]; i++) {
            TFHppleElement *element = [parserArray objectAtIndex:i];
            NSLog(@"%@", [element content]);
        }
    }
    else {
        UIAlertView *alert = [[UIAlertView allocinitWithTitle:@"연결 실패"
                                                        message:@"데이터를 가져올 수 없습니다."
                                                       delegate:self cancelButtonTitle:@"확인" otherButtonTitles:nil];
        [alert show];
        [alert release];
    }
    NSLog(@"connectWebsiteEnd");
}

===============================================================================

- (id)init {
    self = [super init];
    if (self != nil) {
        [self connectWebsite];
    }
    return self;
}

초기화 시키는 메서드입니다.

self(자신)를 super로 init(초기화) 시킨뒤에 self가 nil이 아닐때, 즉 성공적으로 초기화가 됬을때 connectWebsite를 불러줍니다.

그후 self를 반환합니다.


- (void)connectWebsite {
    NSLog(@"connectWebsite");

성공적으로 connectWebsite가 불려졌다면 로그를 찍어확인합니다.


NSString *htmlURL = [NSString stringWithContentsOfURL:
                         [NSURL URLWithString:@"http://www.kma.go.kr/weather/earthquake/internationallist.jsp"encoding:-2147481280 error:nil];

"http://www.kma.go.kr/weather/earthquake/internationallist.jsp"라는 스트링을 NSURL형식으로 변환해준뒤, 다시 NSString형식의stringWithContentsOfURL메소드로 encoding과 error를 넣어서 변환합니다.


NSData *htmlData = [htmlURL dataUsingEncoding:NSUnicodeStringEncoding];

위에서 만들어준 htmlURL를 dataUsingEncoding:NSUnicodeStringEncoding사용해서 htmlData에 넣어줬습니다.


if (htmlData != nil) {
        TFHpple *xpathParser = [[TFHpple alloc] initWithHTMLData:htmlData];
        NSArray *parserArray  = [xpathParser search:@"//*"];
        for (int i = 0; i < [parserArray count]; i++) {
            TFHppleElement *element = [parserArray objectAtIndex:i];
            NSLog(@"%@", [element content]);
        }

}

htmlData가 nil이 아닐경우(통신에 성공해서 데이터를 받아왔을경우), 

htmlData를 TFHpple의 initWithHTMLData메서드로 xpathParser에 넣어줍니다.

NSArray를 하나 만들어준뒤에 xpathParser에 들어간 자료로 파싱을 시작합니다.

지금은 @"//*"로 서치를 하기때문에 필요한 자료이외에 가비지들도 보여집니다.


만들어진 NSArray를 for문으로 돌려서 TFHppleElement로 설정해준 엘레멘트를 뽑아냅니다.

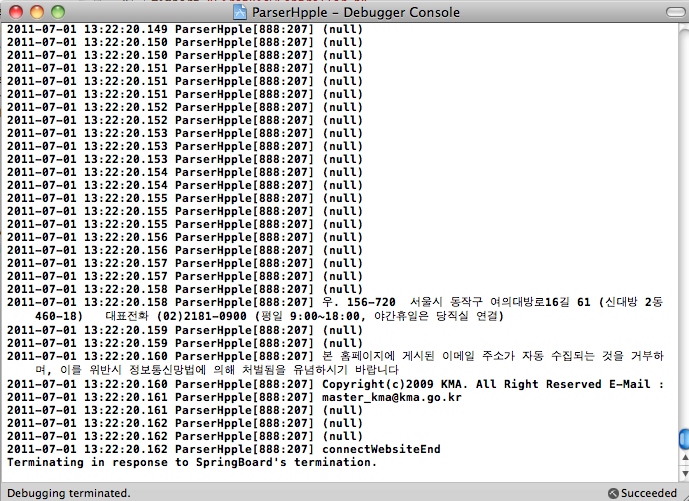
이걸 로그로 출력하면 다음과같은 결과를 얻을수 있습니다.


스크롤을 올려보시면 위에값도 확인하실수 있는데요, 스샷에 보이는 부분이 http://www.kma.go.kr/weather/earthquake/internationallist.jsp 페이지의 제일 하단과 같음을 확인하실수 있습니다.


else {
        UIAlertView *alert = [[UIAlertView allocinitWithTitle:@"연결 실패"
                                                        message:@"데이터를 가져올 수 없습니다."
                                                       delegate:self cancelButtonTitle:@"확인" otherButtonTitles:nil];
        [alert show];
        [alert release];

}

통신이 실패했을경우 UIAlertView를 띄워 유저가 알수있게 합니다.


NSLog(@"connectWebsiteEnd");

NSLog로 메소드의 끝을 확인합니다.


===============================================================================

이제 해당 페이지소스를 보면서 NSArray *parserArray  = [xpathParser search:@"//*"];에 search:@"//*" 부분을 손봐주면 필요한 자료만 뽑을수 있게 됩니다.


2장끗...

Posted by 다오나무
안드로이드2012. 7. 3. 22:15

어플을 만들어 안드로이드 마켓에 등록할려고 하니 이것도 처음 하는 것이라. 쉽지는 않네요. 그래서 등록 방법을 남겨요.


1. 우선 자기가 만든 앱이 필요하겠죠. (apk 파일을 준비하세요)


2. 안드로이드 개발자 사이트로 접속합니다.

https://play.google.com/apps/publish/signup

구글 계정이 있다면 메일과 패스워드를 입력하시면 되지만 없으시다면 새로 가입해야 합니다. 


3. 개발자 정보를 입력해야 합니다.


4. 개발자 약관에 동의에 체크해야 합니다.


5. 마켓에 개발자 등록을 하려면 25$ 의 비용이 발생하는군요. 


6. 결제 정보를 입력하고 결제를 시도합니다. 


 7. 안드로이드 마켓의 결제가 완료되었습니다.


8. 결제가 완료되면 메일로 아래와 같은 메일이 옵니다. 


9. 결제를 하고 일정 시간이 지나면 안드로이드 마켓에 대한 개발자 등록이 승인 됩니다. 


10. 이제 안드로이드 앱을 마켓에 올려볼까요?

애플리케이션 업로드 버튼을 클릭하여 apk 를 올리신 다음 앱의 상세 정보를 입력해 주시면 됩니다.


Posted by 다오나무
ERD2012. 7. 2. 16:27

MySQL GUI Tool로서 MySQL에서 만든 MySQLWorkbench가 있다.

MySQLWorkbench는 다음과 같은 기능을 제공한다.

    * Database Design & Modeling
    * SQL Development (replacing MySQL Query Browser)
    * Database Administration (replacing MySQL Administrator)

다른 무료 툴은 사용해보지 않았으나,

무료 툴치곤 좋은 듯.

Reference:
http://dev.mysql.com/downloads/gui-tools/5.0.html

Posted by 다오나무
PhoneGap2012. 6. 29. 17:40

jQuery Mobile은 어플리케이션이 모바일 환경에 최적화되도록 자동으로 HTML의 상당 부분을 변경하거나 개선합니다. 이러한 jQuery Mobile의 자동 최적화는 대부분의 모바일 어플리케이션에서 유용한 것이지만 어떤 특별한 경우에는 필요치 않거나 오히려 없는 편이 더 나을 수도 있습니다.  jQuery Mobile은 이런 상황을 감안해 기본 설정의 주요 부분을 재정의할 수 있게 지원합니다.

PhoneGap은 HTML파일을 읽어들이면서 HTML문서에서 참조하도록 정의된 phonegap-1.1.0.js 라는 파일을 찾습니다. 그리고 해당 파일이 정상적으로 포함된 경우 deviceready 라는 이벤트를 발생시킵니다.

이 두 라이브러리가 서로 각자 초기화가 완료된 후에야 각 라이브러리에서 제공하는 모든 기능을 충분히 활용할 수 있게 됩니다. 하지만 이 두 라이브러리의 초기화 과정에서 서로 충돌이 발생해서 둘중 한가지는 충분히 초기화 되기 이전에 페이지가 사용자에게 노출되어 에러를 발생하게 하는 원인이 됩니다.


PhoneGap의 초기화 이벤트 처리하기

앞에서 이야기 했듯이 PhoneGap은 deviceready라는 이벤트를 HTML문서가 초기화 되면 발생시킵니다.

HTML파일에서는 다음과 같이 PhoneGap의 초기화 이벤트를 처리할 수 있습니다.
  1. <script src="phonegap-1.1.0.js"></script>  
  2. <script type="text/javascript">  
  3. document.addEventListener("deviceready"function(){  
  4.     // 초기화에 필요한 수행  
  5. }, false);  
  6. </script>  


jQuery Mobile의 초기화 수행

jQuery Mobile에서는 jQuery Mobile이 초기화 되기 이전에 필요한 기본 처리들을 충분히 수행한 후에 초기화 할 수 있도록, 자동 초기화를 중지시키고 수동으로 초기화하는 기능을 제공하기 위해서 jQuery Mobile이 초기화 되기 이전에 mobileinit라는 이벤트를 발생시킵니다.

이 mobileinit라는 이벤트를 구현해서 jQuery Mobile이 초기화를 하지 못하도록 막을 수 있습니다.

$.mobile.autoInitializePage 라는 속성에 false라는 값을 대입하면 됩니다.
  1. <script type="text/javascript">  
  2. $(document).bind("mobileinit"function() {  
  3.     $.mobile.autoInitializePage = false;  
  4. });  
  5. </script>  

이 mobileinit라는 이벤트는 jQuery 라이브러리가 로드되고, jQuery Mobile 라이브러리가 로드되기 전에 발생합니다. 따라서 위의 소스는 위치가 매우 중요해 지는데요, 다음과 같이 작성되어야 합니다.
  1. <link rel="stylesheet" href="http://code.jquery.com/mobile/1.0rc2/jquery.mobile-1.0rc2.min.css" />  
  2. <script src="http://code.jquery.com/jquery-1.6.4.min.js"></script>  
  3. <script type="text/javascript">  
  4. $(document).bind("mobileinit"function() {  
  5.     $.mobile.autoInitializePage = false;  
  6. });  
  7. </script>  
  8. <script src="http://code.jquery.com/mobile/1.0rc2/jquery.mobile-1.0rc2.min.js"></script>  

이렇게 $.mobile.autoInitializePage = false; 속성을 지정해 주면 jQuery Mobile은 명시적으로 $.mobile.initializePage(); 라는 메소드를 호출하기 전까지 초기화를 수행하지 않습니다.

PhoneGap과 연관 없이 단순히 필요한 사전 처리만을 수행한 후에, jQuery Mobile을 수행하기 위해서는 다음과 같이 처리하도록 jQuery Mobile API에서 소개하고 있습니다.
  1. <link rel="stylesheet" href="http://code.jquery.com/mobile/1.0rc2/jquery.mobile-1.0rc2.min.css" />  
  2. <script src="http://code.jquery.com/jquery-1.6.4.min.js"></script>  
  3. <script type="text/javascript">  
  4. $(document).bind("mobileinit"function() {  
  5.     $.mobile.autoInitializePage = false;  
  6.     // 초기화에 필요한 처리 (1)  
  7. });  
  8. </script>  
  9. <script src="http://code.jquery.com/mobile/1.0rc2/jquery.mobile-1.0rc2.min.js"></script>  
  10. <script src="phonegap-1.1.0.js"></script>  
  11. <script type="text/javascript">  
  12. $(document).ready(function() {  
  13.     // 초기화에 필요한 처리 (2)  
  14.      $.mobile.initializePage();  
  15. });  
  16. </script>  
만약 초기화 과정에서 jQuery Mobile에서 제공하는 $.mobile 이라는 객체의 기능을 사용해야 한다면, 초기화 처리는 (2)번 부분에 기술되어야 하며, 그렇지 않은 경우는 (1)과 (2) 원하는 곳에 넣으면 됩니다. 처음에는 $.mobile.initializePage(); 를 mobileinit 이벤트 함수 안에서 호출했더니 메소드를 찾지 못한다면에 에러가 났었습니다.


moibleinit 이벤트에서 deviceready 이벤트 처리

jQuery Mobile과 phonegap을 함께 초기화 하기 위해서는 jQuery Mobile의 mobileinit 이벤트에서 $.mobile.autoInitializePage = false; 를 지정하여 초기화를 중지시킨 다음에 이 부분에 phonegap의 deviceready 이벤트를 정의해 줍니다.

아래와 같이 처리해 주면, jQuery Mobile은 스스로의 초기화를 중지시킨 후에, phonegap의 deviceready 이벤트가 발생할 때 까지 기다릴 겁니다.
  1. $(document).bind("mobileinit"function() {  
  2.     $.mobile.autoInitializePage = false;  
  3.     document.addEventListener("deviceready"function(){  
  4.         // phonegap의 초기화가 완료된 후의 처리  
  5.     }, false);  
  6. });  

deviceready 이벤트가 발생하여 phonegap의 초기화가 완료되면, 그 안에서 아직 수행되지 않은 jQuery Mobile의 초기화를 명시적으로 호출합니다.
  1. <script src="phonegap-1.1.0.js"></script>  
  2. <link rel="stylesheet" href="http://code.jquery.com/mobile/1.0rc2/jquery.mobile-1.0rc2.min.css" />  
  3. <script src="http://code.jquery.com/jquery-1.6.4.min.js"></script>  
  4. <script type="text/javascript">  
  5. $(document).bind("mobileinit"function() {  
  6.     $.mobile.autoInitializePage = false;  
  7.      document.addEventListener("deviceready"function(){  
  8.         $.mobile.initializePage();  
  9.     }, false);  
  10. });  
  11. </script>  
  12. <script src="http://code.jquery.com/mobile/1.0rc2/jquery.mobile-1.0rc2.min.js"></script>  


샘플코드

아래 샘플은 위와 같은 초기화 방식을 적용하여, jQuery Mobile에서 phoneGap의 deviceready 이벤트를 받아, 단말기의 기본 사양을 출력하도록 한 샘플입니다.

출력 값의 속성 이름을 알기 위해서 phonegap의 샘플 코드를 참조했으며, 출력값을 inset-listview에 넣었습니다.
  1. <!DOCTYPE html>  
  2. <html>  
  3. <head>  
  4.     <title>Hello PhoneGap</title>  
  5.     <meta charset="utf-8"/>  
  6.     <meta name="viewport" content="width=device-width, initial-scale=1.0, maximum-scale=1.0, minimum-scale=1.0, user-scalable=no, target-densitydpi=medium-dpi" />  
  7.     <script src="phonegap-1.1.0.js"></script>  
  8.     <link rel="stylesheet" href="http://code.jquery.com/mobile/1.0rc2/jquery.mobile-1.0rc2.min.css" />  
  9.     <script src="http://code.jquery.com/jquery-1.6.4.min.js"></script>  
  10.     <script type="text/javascript">  
  11.         $(document).bind("mobileinit"function() {  
  12.             $.mobile.autoInitializePage = false;  
  13.             document.addEventListener("deviceready"function(){  
  14.                 $.mobile.initializePage();  
  15.                 document.getElementById("platform").innerHTML = device.platform;  
  16.                 document.getElementById("version").innerHTML = device.version;  
  17.                 document.getElementById("uuid").innerHTML = device.uuid;  
  18.                 document.getElementById("name").innerHTML = device.name;  
  19.                 document.getElementById("width").innerHTML = screen.width;  
  20.                 document.getElementById("height").innerHTML = screen.height;  
  21.                 document.getElementById("colorDepth").innerHTML = screen.colorDepth;  
  22.             }, false);  
  23.         });  
  24.     </script>  
  25.     <script src="http://code.jquery.com/mobile/1.0rc2/jquery.mobile-1.0rc2.min.js"></script>  
  26. </head>  
  27. <body>  
  28. <div data-role="page">  
  29.     <div data-role="header">  
  30.         <h1>PhoneGap Init</h1>  
  31.     </div>  
  32.     <div data-role="content">  
  33.         <ol data-role="listview" data-inset="true" data-theme="d">  
  34.             <li>Platform: <span id="platform"> &nbsp;</span></li>  
  35.             <li>Version: <span id="version"> &nbsp;</span></li>  
  36.             <li>UUID: <span id="uuid"> &nbsp;</span></li>  
  37.             <li>Name: <span id="name"> &nbsp;</span></li>  
  38.             <li>Width: <span id="width"> &nbsp;</span></li>  
  39.             <li>Height: <span id="height"> &nbsp;</span></li>  
  40.             <li>Color Depth: <span id="colorDepth"> &nbsp;</span></li>  
  41.         </ol>  
  42.     </div>  
  43. </div>  
  44. </body>  
  45. </html>  

실행하면 아래와 같이 결과가 나옵니다. 안드로이드 (삼성 갤럭시S2)에서만 테스트 해 봤습니다.

혹시 iOS나 다른 폰에서 결과가 동일하지 않다면 피드백 주시면 감사하겠습니다.

Posted by 다오나무
jQuery Mobile2012. 6. 29. 16:06

문제
jQuery Mobile을 사용하면 화면의 세로 사이즈보다 긴 컨텐츠로 인해 페이지가 스크롤되면서 Header와 Footer가 화면에서 사라지는 경우가 많이 발생한다. data-position="fixed"을 사용하면 항상 위에 있긴 하지만, 페이지가 스크롤 될 때에는 사라졌다가 스크롤이 끝난 후에 다시 나타나게 된다.


반면, 네이티브 언어로 작성된 애플리케이션의 경우 Header와 Footer가 항상 제자리를 유지하게 되는데, jQuery Mobile에서도 이와 같이 항상 제자리를 유지하게 하는 방법이 있다.


해결 방법
핵심을 먼저 말하자면, 컨텐츠 사이즈를 고정시키는 것이다. 컨텐츠의 사이즈를 고정시키고, 고정된 사이즈 안에서 컨텐츠를 스크롤되게 하면 Header와 Footer는 제자리를 유지하게 된다.

pageshow 이벤트 핸들러에서 header와 footer의 height를 구한 후, screen.availHeight에서 두 높이를 뺀 값을 content의 height로 설정해주면 된다.

$("div[data-role='page']").live( "pageinit", function( event )
{
	for( var i = 0; i < 26; i++ )
	{
		var li = document.createElement( "li" );
		li.innerText = String.fromCharCode( i + 65 );
		$("#list").append( li );
	}
	
	$("#list").listview( "refresh" );
} );

$("div[data-role='page']").live( "pageshow", function( event )
{	
	resizeContent();
} );

function resizeContent()
{
	var headerHeight = parseInt( $("div[data-role='header']").css( "height" ) );
	var footerHeight = parseInt( $("div[data-role='footer']").css( "height" ) );
	var contentHeight = screen.availHeight - headerHeight - footerHeight - 78; // 78 : iPhone bottom bar height (retina)
	$("div[data-role='content']").css( "height", contentHeight );
}

그러면 아래와 같이 컨텐츠가 스크롤되더라도 Header와 Footer의 위치가 항상 제자리에 있는 모습을 볼 수 있다.


참고


Posted by 다오나무
jQuery Mobile2012. 6. 29. 16:05

jQuery mobile 은 각 페이지 요소를 표현하는 CSS 설정이 default로 함께 딸려 있다. Prototype 용으로 이런 default 설정을 그대로 사용하는 것이 매우 편리하지만, 앱 디자인을 customize하기 위해선 default CSS 설정을 제거하고, 새롭게 CSS 를 설정해 디자인을 조정해야 한다.

본 post에서는 jQuery mobile 의 페이지 기본 요소인 header, content, footer 로 이루어진 페이지에서 이들 세 요소가 전체 화면 영역을 차지하도록 하는 한 가지 방법을 소개한다.


# jQuery mobile 의 기본 페이지 설정

<section data-role='page' >

  <div data-role=header >

      HEADER

  </div>

  <div data-role=content>

      CONTENT

  </div>

  <div data-role=footer>

     FOOTER

  </div>

</section>


구체적으로, header와 footer 를 설정하고 남은 영역을 content 가 완전히 차지하게 하는 것이 목표. 이 때 content가 차지하는 영역은 전체 화면 영역에서 header와 footer를 차지하는 영역을 제외한 나머지 영역을 단 1px 도 넘거나, 부족하지 않게 하는 것이 핵심이다.


방법1 :: Static  할당 
header와 footer 그리고 전체 화면 크기를 확인해보고, 전체 화면 크기에서 header와 footer를 제외한 영역을 px단위로 정확하게 <div data-role=content> 에 할당한다.

문제점: 서로 다른 모바일 기기들은 각기 다른 화면 사이즈를 가지는데, 이 방법을 이용한다면 각 모바일 기기들에 따라 서로 다른 content 영역 사이즈를 할당해야 하는데,  상당히 번거롭다는 점 뿐만 아니라, 현실적으로 존재하는 모든 device를 테스트 하기 어렵다는 근본적인 문제에 봉착한다.


방법2::  Dynamic 할당
 각 요소 사이즈를 javascript를 이용해 계산하고, content 사이즈를 할당하는 방법. javascript를 통해 동적으로 사이즈를 할당하기 때문에, 다양한 device에서도 제대로 된 영역의 사이즈를 계산하고 할당할 수 잇다.


Step 1) header와 footer 영역 사이즈 계산 
data-role=header, footer, content 모두에 padding 값이 설정되어 있다. 요소가 차지하는 전체 사이즈는 height + padding + border 이기 때문에 header와 footer 가 차지하는 공간을 계산하기 위해서는 height+padding+border 를 계산해주는 jquery의 outerHeight 메소드를 이용한다.


var head_height=$('[data-role=header]').outerHeight();

var footer_height=$('[data-role=footer]').outerHeight();


Step 2) Content 영역의 default CSS 제거 
content 영역의 padding, border 사이즈를 고려하여 height 를 알아내고, height 사이즈 만을 변경할 수도 있지만, 이 보다는 default padding, border 사이즈를 0으로 두고, height 사이즈를 변경하고, 필요하면 이후 다시 padding, border 를 CSS 를 이용하여 할당하는 쪽의 코드가 더 간결하고 명확하다는 개인적인 생각이다. 따라서 여기서는 content의  default CSS 를 제거한다.


# content 의 default padding, border 사이즈를 0으로 설정한다.

div[data-role=content]{

  padding:0;

  border:0

}


Step 3) header와 footer 가 차지하는 영역을 제외한 영역을 height가 차지하도록 설정
앞서 계산한 header와 footer 의 영역을 제거한 나머지 공간을 content가 차지하도록 설정을 한다.

  # 전체 화면의 높이 $(document).height() 에서 앞서 계산한 head와 footer의 높이를 뺀 공간의 높이를 계산하고 이를 content 영역의 높이로 설정

  var content_height= $(document).height() - head_height - footer_height ;

 $('[data-role=content]').css('height', content_height+'px');

'jQuery Mobile' 카테고리의 다른 글

[jQuery Mobile] 항상 제자리에 있는 Header와 Footer  (0) 2012.06.29
Posted by 다오나무
영삼이의 IT정보2012. 6. 26. 21:20

프로젝트를 새로 Import시
Remove @Override annotation 이란 에러가 @Override 있는 데마다 뜸.

--> 자바 빌드 버젼이 안 맞아서 그런다.

Project --> Properties --> Java Compiler --> Enable project specific settings 체크 박스 체크 
Compiler compliance settings 리스트박스에서 자신의 자바 버전에 맞게 선택 


Posted by 다오나무
PhoneGap2012. 6. 26. 15:30

PhoneGap(폰갭)에서는 anrdoid.app.Activity.onKeyDown() 메소드를 아래와 같이 재정의하여 사용자가 하드웨어 취소키(back키)를 누르면 브라우저의 뒤로가기를 수행합니다.

// com.phonegap.DroidGap.onKeyDown(int, KeyEvent) 메소드 

public boolean onKeyDown(int keyCode, KeyEvent event) {
 ... ...
     // If back key
     if (keyCode == KeyEvent.KEYCODE_BACK) {

     // If back key is bound, then send event to JavaScript
     if (this.bound) {
     this.appView.loadUrl("javascript:PhoneGap.fireEvent('backbutton');");
     }

     // If not bound
     else {

     // Go to previous page in webview if it is possible to go back
     if (this.appView.canGoBack()) {
     this.appView.goBack();
     }

     // If not, then invoke behavior of super class
     else {
     return super.onKeyDown(keyCode, event);
     }
     }
     }
... ...


그러나 때로는 사용자가 취소키를 누르면 이전 웹페이지로 이동하지 않고 앱을 종료시키는 것으로 정책을 바꾸고 싶은 경우도 있습니다. (특히나 아이폰을 고려하여 이전버튼을 포함하도록 웹페이지를 디자인한 경우).

폰갭에서는 취소키 동작을 재정의하는 2가지 방법이 있습니다.
 
1. DroidGap의 onKeyDown 메소드 오버라이딩
DroidGap을 상속받은 Activity에서 onKeyDown 메소드를 오버라이딩해서 백버튼을 적절히 핸들링해줍니다. 아래코드에서는 앱 종료여부를 묻는 확인창을 띄우도록 했습니다.

@Override
public boolean onKeyDown(int keyCode, KeyEvent event) {
    if (keyCode == KeyEvent.KEYCODE_BACK) {
        confirmAppExit();
        return true;
    }
    return super.onKeyDown(keyCode, event);
}

private void confirmAppExit() {
    AlertDialog.Builder db = new AlertDialog.Builder(this);
    db.setTitle(R.string.exit_app_title)
         .setMessage(R.string.exit_app_message) // "프로그램을 종료하시겠습니까?"
         .setCancelable(true)
         .setPositiveButton(android.R.string.ok, new OnClickListener() {
             @Override
             public void onClick(DialogInterface dialog, int which) {
                 finish(); //확인버튼 누루면 앱 종료
             }
         })
         .setNegativeButton(android.R.string.cancel, null)
         .show();
}


2. 폰갭 javascript의 'backbutton' 이벤트 재정의(phonegap 0.9.5 이상)

function onLoad() {
    document.addEventListener("backbutton", backKeyDown, true);
}
function backKeyDown() {
    if (confirm('프로그램을 종료하시겠습니까?')) {
        navigator.app.exitApp();
    }
}
...
...
<body onload="onLoad()">


단순히 취소키 눌렀을 때 페이지 뒤로가기를 막으려면 아래코드로 충분합니다.

navigator.app.overrideBackbutton(true);

Posted by 다오나무